How to Make Twitch Highlights
Before we get into the details of how to create a Twitch highlight, maybe we should start with why you might want to create one. It should go without saying that as the ability to create a highlight is a built-in feature of Twitch it’s strongly implied that this is something that you’re going to want to do in order to be a successful Twitch game streamer. But why? What is it about highlights that are going to help your stream channel?
The simplest explanation is that highlights are how you can draw attention of both your current fans and potential new viewers to your channel when you’re not currently streaming. This is an imperative in order to continually grow your channel and engage with viewers. Naturally, this is practically a prerequisite to becoming a successful streamer.
So what even is a highlight anyway? Essentially a Twitch highlight acts as a timestamp within a video-on-demand, and can be compiled into a highlights video that does not expire, that is to say it is permanent until or unless you delete it. Basically, a highlight is going to be a moment in your game stream that is the most exciting and entertaining for viewers. Let’s face it, in a four, six, or even eight hour long stream, it’s not going to be a whirlwind of excitement every single second. That just simply is not realistic. There’s going to be some down time, such as waiting for loading screens, navigating menus, taking routine short breaks, or having unexpected interruptions. This isn’t at all a bad thing during a livestream, it’s practically expected.
But the experience of watching a livestream is not really that same as watching a video of a stream. Not being live does make a difference for a lot of viewers, and generally it’s usually not as interesting. The last thing you want is people watching your content and then leaving because they find it boring. That’s a lost viewer you might never get back! Don’t let it happen! That’s why it’s so important to create a highlight video from your stream so that you can show off the best moments. It’s like putting your best foot forward. You want to make the moments that viewers are most likely to find entertaining, exciting, or funny, as available and accessible as possible. There could be something like no-scoping an opponent, finding a weird bug, something spontaneous and organic happening in the chat, getting ganked or spawn-camped, almost anything, just so long as it’s fun. The truth is that this may often depend on your ability to exercise and consistently display your natural charisma when on camera, which is imperative to drawing in new viewers and retaining existing ones.
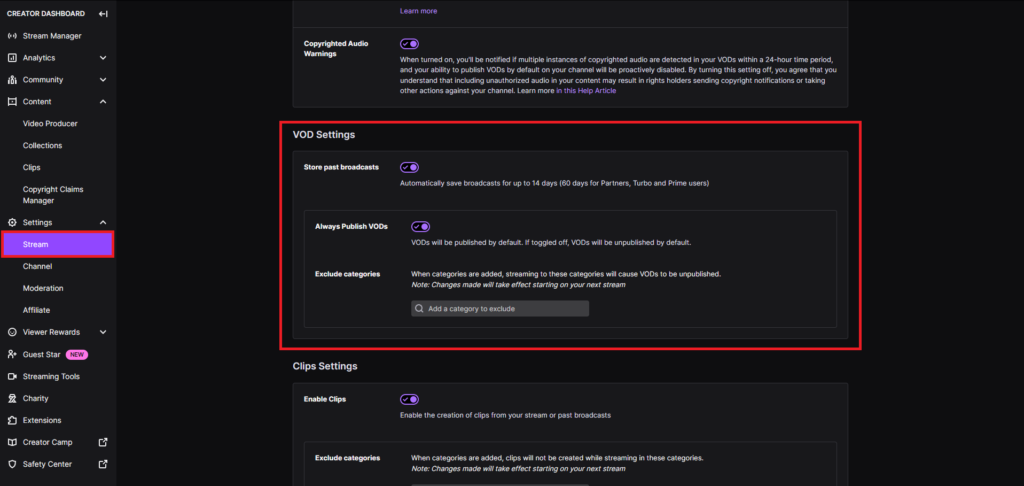
Now that we’ve got that out of the way, we can get into how to make a Twitch highlight. Before you do anything else, you absolutely must have enabled past broadcasts in the settings of your Twitch account. You do this by going to your dashboard, click on the ’Settings’ tab, click the ‘Stream’ button, then find the box labeled ‘Store past broadcasts’. If a checkmark is visible that means the feature is enabled your broadcasts will be held on Twitch for 7 to 60 days, depending on factors such as being a Twitch partner or affiliate, or having an Amazon Prime account. As touched on earlier, a Highlight video does not expire like your livestreams will. This will be how you can hold onto this content on Twitch without losing it forever. (Another alternative is to record your livestream and post it to your YouTube page).
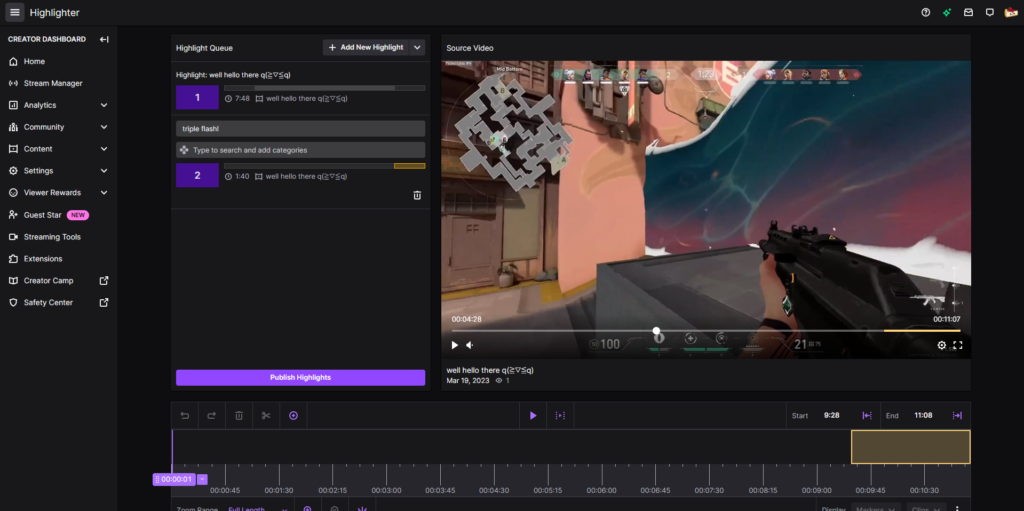
The next steps are not too difficult. First, open Video Producer, which can be found in the left navigation menu on your Creator Dashboard, or in the menu below your Profile Picture on the Home Page. Under one of your previous live broadcasts you will see a button labeled ‘Highlight’ which will open the Highlight Editor when clicked. It will automatically create a single small segment on the video, which you can adjust to include however much of the stream you wish to include within that highlight. Usually a highlight will be about 30 – 90 seconds long, any longer than that and it sort of defeats the purpose.
To create another highlight, drag the purple timestamp across the video timeline to the next segment of the stream that would make a good highlight, which ideally you’ve already indicated with a Stream Marker. You can include any number of highlights from a livestream into one video, and the highlights can be various lengths. There’s a fairly high degree of customizability available so don’t squander that.
Finally, send a little time double checking that you have each highlight correctly selected, and then click the ‘Publish Highlights’ button. Now your highlights video will appear on your Twitch page! Technically speaking there is no limit to the length of a Twitch Highlight, and theoretically you could include the entire length of the stream into that highlight, but again, that is something not in keeping with what an ideal highlight is generally expected to be.
Your newly published Twitch Highlight will remain permanently on your Twitch account page until and unless you or Twitch deletes it. (To prevent Twitch from deleting your video be sure to utilize non-copyrighted music, or no music at all).
Naturally much of that process requires a lot of manual effort, which can be time consuming and frustrating, but there is another option! You can try out Sizzle.gg, which is a new online service that creates highlights automatically! Sizzle.gg’s advanced AI can detect all the moments in your livestream that would make a good highlight, whether it’s on Twitch or YouTube, and creates a new video within a few hours. This new video will exist on the Sizzle platform, but can be easily published on all your social media, such as Twitter, TikTok, Instagram, and Facebook. It’s free while in beta so head over to their website and create a new Sizzle.gg account today!